What is a flute?
The flute is a musical instrument that belongs to the woodwind family. Flutes were originally made out of wood but most modern flutes are made of metal. Unlike other woodwind instruments, the flute produces sound from the flow of air across an opening rather than from a reed.
A flute is a cylindrical tube with holes placed along its length. Players cover or uncover these holes with their fingers or keys to produce different pitches. To play the flute, the musician blows across the edge of the instrument’s embouchure hole. This creates a vibration in the air column inside the flute, producing sound. The pitch can be altered by changing the length of the air column, achieved by opening or closing the holes along the flute’s body.
Different types of flutes have been developed by cultures from all corners of the world, including the bamboo flutes of Asia to the pan flutes of South America as well as the North American Courting flute that we will focus on in this article.
What is a Courting flute?
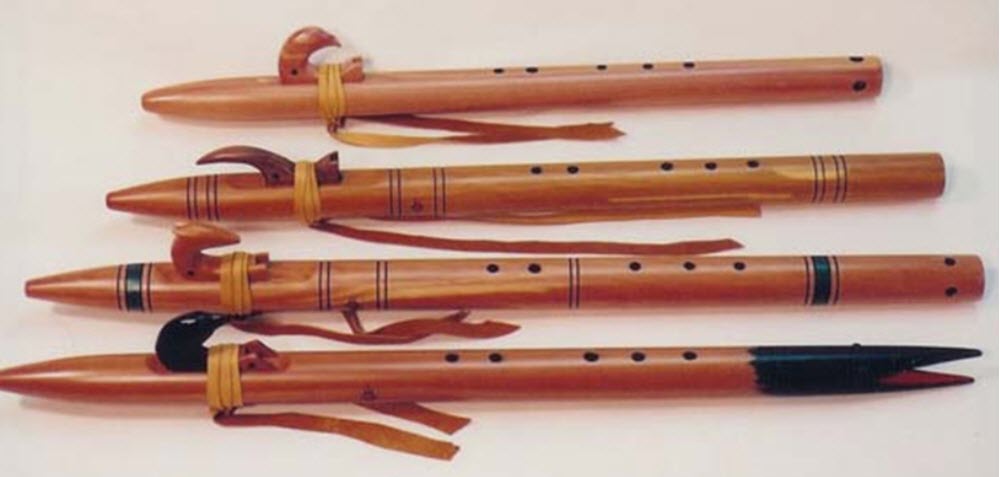
The Native American (courting) flute is a flute with open finger holes (not keys). It has two chambers and is held in front of the player. One of the chambers (the slow air chamber) if for collecting the breath of the player, while the other chamber (the sound chamber) creates the sound. The player will breathe into one end of the flute, and a block on the outside of the flute directs the air from the first chamber to the second chamber.
This flute has open finger holes instead of keys, and is played by the direct application and removal of the fingers. It is therefore considered a simple system flute.
Even though this flute directs air into one end, it is not considered an end-blown flute in a strict sense of the word. That is because the sound mechanism rely on a fipple design with the abovementioned external block fixed to the instrument.
The soundhole at the proximal end of the sound chamber makes the air from the player´s breath vibrate, and the distinct courting flute sound can be heard when there is a steady resonance of air pressure in the sound chamber.
Classification
The 2011 revision of the Hornbostel-Sachs system classifies this flute as belonging to cathegory 421.23: “Flutes with internal duct formed by an internal baffle (natural node, block of resin) plus an external tied-on cover (cane, wood, hide)”. It is thus placed in the same cathegory as the Suling, a Southeast Asian ring flute made from a long, thin-walled bamboo tube.
Playing range
Native American (courting) flutes come in a wide range of designs and sizes, but the typical playing range is 1 – 11⁄3 octaves.
The root keys of contemporary commercial available flutes typically span a range of about three and half octaves, from C2 to A5.
Scale
Early recordings of Native American flutes show that many different putch standards were employed in the past. By the mid-1980s, the pentatonic minor scale had become the dominant one among contemporary Native American flute players. In the 21st century, however, this dominance have been broken up again by more experimental and flexible approaches.
The warble
Some Native American (courting) flutes – especially traditional ones – produce a distinct sound known as “the warble”. When the flute is warbling, it sounds as if it is vacillating back and forth between distinct pitches, but in reality, what we hear is actually different harmonic components of the same sound coming into dominance at different times.
Researcher John W. Coltman has described two main types of warbling:
- Warbling of the order 20 Hz, caused by a nonlinearity in the jet current.
- Warbling where amplitude modulation occurs in all partials but with different phases.

Advertising:
Day trading forex
Day trading has become very popular and thousands of new people try day trading every day. Many of them fail to become day traders but there are also many who succeed. The key to becoming a successful day trader is preparation, You need to learn how to trade before you start trading. If you do not know how to evaluate which trades to make then you are doomed to fail. You need to teach yourself to become a trader before you start trading. There are many books and websites about day trading. One of the best is daytrading.com. A website about all types of day trading.

Native American names
This flute is widely dispersed across many language groups and geographical regions and is therefore known by several different Native American names.
Here are a few examples:
- Cheyenne: tâhpeno
- Chippewa: bĭbĭ’gwûn
- Dakota: ćotaŋke
- Kiowa: do’mba’
- Lakota: Šiyótȟaŋka
- Opata: bícusirina (Teguima language)
- Unami: achipiquon (Lenape/Delaware language)
- Zuni: Tchá-he-he-lon-ne, which means Sacred Warbling flute
English names
Examples of common English-language names:
- (Native American) Courting flute
- (Native American) Love flute
- Grandfather’s flute
- Sacred Warbling flute
- Plain´s Indian Courting flute
This flute is often referred to simply as Native American flute in English, but that can cause misunderstandings since it is not the only Native American flute in existence. There is for instance the Siku, which is also a Native American flute since it is made and played by Native American peoples in the Andes of South America.

